


Creating 3D models is essential for successful 3D printing. If you don’t carefully plan your designs, your prints might face issues like weak spots or incorrect dimensions. For instance, printing too quickly can result in fragile prints. Choosing the right print orientation, such as 0 degrees for ASIGA resin, ensures stronger and more precise results. By following clear steps, you can create 3D models that are accurate and reliable, whether for personal projects or professional use.
Key Takeaways
- Plan your 3D model carefully. Consider its purpose and how it will be printed to avoid issues later.
- Choose the right software for your skill level. Beginners can start with Tinkercad, while advanced users may prefer Blender or Fusion 360.
- Test your design for strength. Use simple checks to ensure it can handle pressure and avoid weak spots.
- Export your model in the correct format. Use STL for most prints, but consider 3MF for detailed designs with colors.
- Adjust print settings like layer height and speed. Experiment to find the best combination for quality prints.
Understanding the Basics of 3D Modeling for Printing
What Makes a 3D Model Printable
To make a good 3D model for printing, it must follow certain rules. The model should be solid with no gaps or holes. If edges or points are not connected properly, it can cause printing problems. The size and shape of your model must also be correct. It should match the purpose you designed it for.
The inside of your model is important too. Patterns like grids or triangles and how much material is used (e.g., 30% or 50%) affect strength and material use. For example, using more material makes the print stronger but uses more resources. Other factors, like how much stress the model can handle, also matter.
Common Challenges in 3D Printing
3D printing has some tricky parts. Warping happens when the edges of a print lift because of uneven cooling. Parts that stick out or have no support can sag or fail. High heat from printers needs to be watched carefully to avoid accidents. Like other machines, 3D printers can sometimes cause electrical fires.
Another problem is making sure the model sticks to the base. If it doesn’t, the print might move or fail. Wrong printer settings can also make the size of the print incorrect. Fixing these problems means checking details and taking care of your printer often.
Essential Tools for Creating 3D Models
Using the right tools helps make better 3D models. Programs like Blender, Tinkercad, and Fusion 360 help you design and edit easily. AI tools can do boring tasks for you, so you can focus on being creative. These tools also save money and are great for beginners.
For top-quality prints, methods like SLS (Selective Laser Sintering) give smooth surfaces and strong layers. This method works well for detailed models, like body parts. AI tools can also create models for games, buildings, and healthcare.
SLS is great for making detailed and flexible models. It’s perfect for projects needing precision and strength.
Step-by-Step Guide to Make a Printable 3D Model
Planning Your 3D Model for Printing
Good planning is key to successful 3D printing. Before designing, think about your model’s purpose. Will it need to handle pressure, fit with other parts, or just look good? Answering these questions helps you make models that work well.
Think about how easy your design is to print. For example, designs with overhangs or no support might need extra help during printing. Check the size and details of your model to ensure it works with your printer.
Planning is very important in areas like healthcare. 3D printing helps doctors see and understand better, especially for surgeries. It turns 2D images into 3D models, helping doctors plan better and save time. This leads to faster and safer surgeries.
Tip: Draw your idea on paper or use simple software first. This helps you avoid mistakes and saves time later.
Picking the Right Software for 3D Modeling
Choosing the right software is important for making great 3D models. Different tools have features for beginners or experts. New users like Tinkercad, while pros may use Fusion 360 or Blender.
Make sure the software works with your printer and supports STL or OBJ files. Look for tools that make designing easier, like templates or repair options. Some programs even use AI to handle boring tasks, so you can focus on creativity.
AI tools can also improve your model’s shape for better printing. They might suggest changes to make your design stronger or more stable.
Note: Many programs offer free trials or student versions. Try a few to find the one you like best.
Designing for Strength and Easy Printing
Designing for strength and easy printing helps your model work well. Think about how strong your design is. Thin walls, sharp edges, or unsupported parts can make it weak. Fix these to make your model sturdy.
Test your design’s strength with simple checks. For example:
| Test Method | Purpose |
|---|---|
| Dimensional Accuracy | Checks if your printer can handle small gaps and sizes. |
| Overhang Test | Tests if your printer can handle angles without sagging. |
| First Layer Calibration | Makes sure the first layer sticks well for better quality. |
You can also use test models like cubes or gauges to check flatness and angles. These tests help you improve your design for better printing.
Follow these steps to test your design:
- Make or download a model with holes, overhangs, and thin parts.
- Use normal printer settings like layer height and speed.
- Print without supports to see how stable your design is.
Tip: Add rounded edges or sloped corners to your design. This spreads out pressure and makes your model stronger.
Exporting Your 3D Model in the Correct Format
Saving your 3D model in the right format is very important. The format decides how well your printer understands the design. It also affects how good the final print looks. To get the best results, learn about supported formats and follow simple steps.
Why File Format Matters
3D printers need specific file formats to work properly. If you save your model in the wrong format, the printer might not read it. This can cause mistakes, wasted material, or failed prints. Picking the right format keeps your design correct and ready to print.
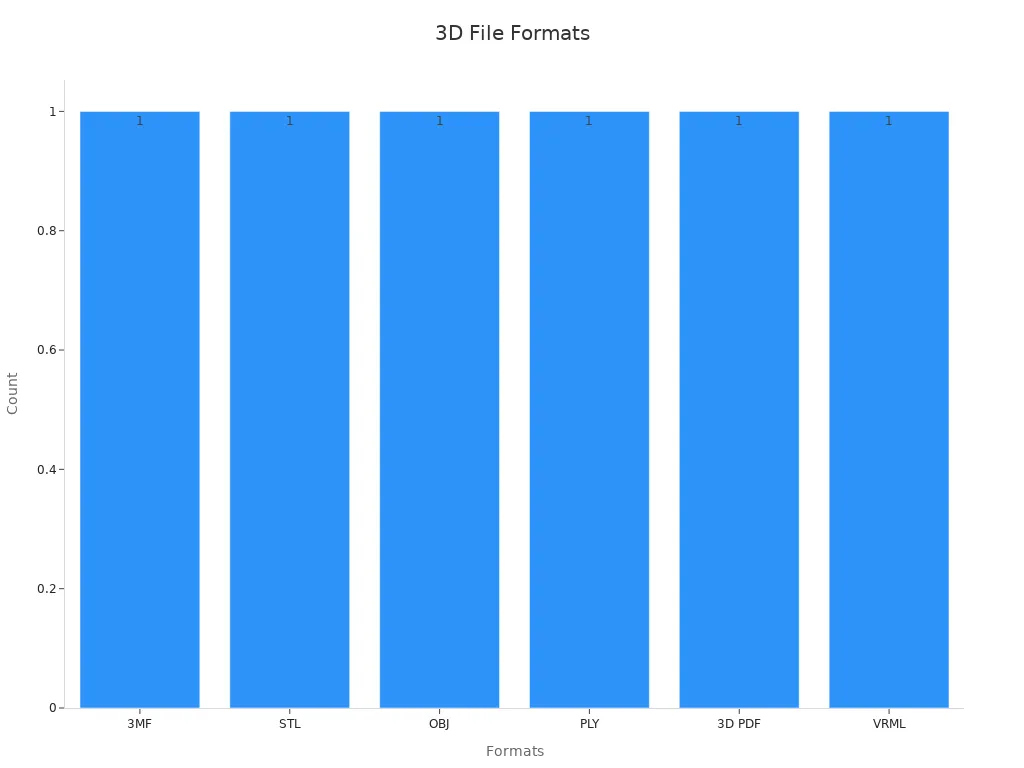
The most common formats for 3D printing are STL, OBJ, and 3MF. These formats keep your model’s shape and details safe for printing. Some formats, like 3MF, also save extra details like colors and materials. This makes them great for advanced projects.
| Supported File Formats |
|---|
| 3MF |
| STL |
| OBJ |
| PLY |
| 3D PDF |
| VRML |
Steps to Export Your 3D Model
Here’s how to save your 3D model for printing:
- Check for Problems: Look for gaps or broken edges in your model. Fix these to make sure it prints well.
- Pick the Right Format: Choose a format your printer supports. STL is simple and popular, while 3MF works for detailed designs.
- Set Export Options: Many programs let you change export settings. For example, you can adjust resolution to balance detail and file size. Higher resolution gives better quality but makes files bigger.
- Save and Test: Save your file and check it with slicing software. This step makes sure your file is correct and ready to print.
Popular Formats and Their Usage
Different formats are good for different jobs. STL is the easiest and works for most 3D printing. OBJ adds colors and textures, making it great for art projects. 3MF is becoming popular because it saves extra details like materials and supports.
Tip: Always check your printer’s manual to see which formats it supports. This avoids problems and saves time.
By saving your 3D model in the right format, you make printing easier and better. This step helps you create models that are strong and look great.
Optimizing Your 3D Model for Printing
Checking and Fixing Non-Manifold Geometry
Non-manifold geometry can cause problems when printing. It happens when parts of your model have edges or points that don’t connect correctly. These mistakes confuse the printer, leading to failed prints or weak designs. Fixing these issues makes your model ready for printing.
To find and fix non-manifold geometry, use tools like Blender’s 3D Print Toolbox. This tool helps you:
- Measure your model’s volume and area to check its shape.
- Spot edges that don’t connect to two faces, showing problem areas.
- Flatten distorted faces by turning them into triangles for better printing.
Fixing these problems improves your model’s quality. Always check your design carefully before moving forward.
Tip: Look for gaps or overlapping edges often. Fixing them early saves time and materials.
Simplifying and Remeshing Your 3D Model
Simplifying your model removes extra details, making it easier to print. Too much detail can make files big and slow down printing. Simplifying keeps your model useful without losing its purpose.
Remeshing is also important. It changes your model’s mesh to have evenly spaced polygons. This helps your model print better and keeps its shape. Tools like Blender and Fusion 360 can remesh your design. These tools let you adjust the mesh density for a good balance of detail and efficiency.
Focus on simple areas like flat surfaces or hidden parts when simplifying and remeshing. This reduces errors and speeds up printing.
Note: Don’t remove too much detail. It can make your model less useful or look bad.
Scaling and Adjusting Dimensions
Scaling your model makes sure it fits your printer and meets your needs. Adjusting size also keeps your print accurate. Before scaling, think about things like minimum feature size and layer thickness. These affect how detailed your print will be.
Here’s how scaling and dimensions affect accuracy:
| Measurement/Factor | Description |
|---|---|
| Dimensional Accuracy | Makes sure printed size matches your design. |
| Layer Thickness | Affects detail, especially in height. Thicker layers may cause errors. |
| Minimum Feature Size | Smallest details your printer can handle, based on nozzle size. |
| Build Size | Big models might shrink or warp due to uneven cooling. |
| Machine Calibration | Regular checks keep print quality and accuracy consistent. |
Use your software’s tools to scale your model evenly. Don’t stretch just one side, as it can ruin the shape. After scaling, test your model in slicing software to ensure it fits your printer.
Tip: Calibrate your printer before printing a scaled model. This keeps dimensions correct and quality high.
Adding Supports for Overhangs
Overhangs in 3D models can be tricky to print. These are parts that stick out without anything below to hold them up. If not supported, they might bend, warp, or fail. Adding supports helps keep these areas steady during printing.
Why Overhangs Need Supports
3D printers build models one layer at a time. Each layer needs the one below it for support. Overhangs over 45 degrees don’t have enough backing. This can make the material droop or lose shape. Supports act as a temporary base to hold the overhang until printing is done.
Tip: Test your printer with an overhang model. This shows the steepest angle it can print without supports.
Types of Supports You Can Use
There are different supports for various designs. Here are the main ones:
- Tree Supports: These look like tree branches. They use less material and are easy to remove. They’re great for curved or detailed models.
- Linear Supports: These are straight and grid-like. They are strong but need more material and effort to take off.
- Custom Supports: Some software lets you add supports only where needed. This saves material and reduces cleanup.
Pick the type that works best for your design and printer.
How to Add Supports in Your Design
Adding supports is simple with most 3D software. Follow these steps:
- Find Overhangs: Use the software to spot areas over 45 degrees that need support.
- Choose Support Type: Pick tree supports for complex shapes or linear for simple ones.
- Adjust Settings: Change density, pattern, and placement. Lower density uses less material, while higher density gives stronger support.
- Preview Supports: Check the software’s preview to see if supports are placed correctly.
- Test Print: Print a small part of your model to check the supports.
Note: Avoid putting supports in hard-to-reach spots. This makes cleanup easier.
Removing Supports After Printing
After printing, carefully remove the supports. Use tools like pliers or cutters to avoid damaging your model. Sandpaper can smooth rough areas left behind.
Tip: If you used dissolvable supports, soak them in water or the right solvent. This is perfect for detailed designs.
Adding supports the right way helps you handle overhangs easily. It keeps your model stable and ensures a great print every time.
Choosing the Right 3D Printing Software
What to Look for in Slicing Software
Picking good slicing software improves your printing results. It turns your 3D model into layers for the printer. To get better prints, choose software with helpful features.
| Feature | What It Does |
|---|---|
| Smart Slicing Tools | Adjusts layer heights, infill, and supports for better prints. |
| Custom Supports | Lets you add supports where needed for tricky designs. |
| Layer Preview | Shows each layer to find mistakes and fix settings. |
| Auto-Orientation | Suggests the best way to position your model for fewer supports. |
| Material Profiles | Offers ready-made settings for different filament types. |
These tools help avoid problems like weak layers or bad supports. For example, layer previews show errors before printing, saving time and materials.
Tip: Pick software that fits your skill level. Beginners need simple tools, while experts want more options.
Popular Slicing Software Choices
There are many slicing tools, each with unique features. Here are some popular ones:
- Ultimaker Cura: Free and easy for beginners but has advanced settings too. It works with many printers and allows custom adjustments.
- PrusaSlicer: Great for detailed designs, with flexible settings and profiles for Prusa printers.
- Simplify3D: A paid tool offering strong control over supports and print settings.
- Lychee Slicer: Best for resin printing, with detailed support options and a simple interface.
Each software has its strengths. For instance, Cura is beginner-friendly, while Simplify3D is ideal for professionals needing advanced features.
Note: Try different software to see which one works best with your printer and designs.
Testing Your Model in the Software
Before printing, test your model in the slicing software. This step ensures your design is ready and avoids printing problems. Start by loading your model and checking for errors like gaps or unsupported parts.
Use the layer preview to see how each layer will print. Look for weak spots, gaps, or extra supports. Change settings like infill, layer height, or support placement to improve your design.
Testing also shows how the software handles your model. Some tools suggest better orientations or highlight problem areas. This helps make your model easier to print and saves time.
Tip: Print a small test piece first. This helps catch mistakes early and adjust settings before printing the full model.
Configuring Print Settings for Success
Adjusting Layer Height, Infill, and Speed
Changing layer height, infill, and speed helps make better prints. Layer height decides how detailed your model will be. Smaller heights give smoother surfaces but take longer to print. Bigger heights are faster but may lose detail. A good range is 0.1 mm to 0.2 mm for most designs.
Infill controls how strong your model is and how much material it uses. Higher infill, like 50%, makes stronger models but uses more material. Lower infill, like 20%, works for items that don’t need strength. Speed also matters. Printing too fast can cause mistakes, while slower speeds improve accuracy. Start at 50 mm/s and adjust based on your printer.
Tip: Try test prints to find the best layer height, infill, and speed for your project.
Setting Temperature and Material Parameters
Temperature settings affect how well your print sticks and lasts. The nozzle temperature should match the material. For example, PLA needs 190–220 °C, while ABS needs 230–250 °C. The bed temperature also helps. A heated bed at 60 °C works for PLA, and ABS needs 100 °C.
Studies show that chamber and bed temperatures change print quality. For example, implants printed at 50 °C chamber and 130 °C bed temperatures were stronger. Lower bed or higher chamber temperatures made prints weaker. Higher nozzle temperatures improved material flow, making layers stick better and hold more weight.
| Parameter Type | Findings | Description |
|---|---|---|
| Printing Parameters | Central Composite Design | Tests how different settings affect print quality. |
| Input Parameter Range | Predicted from prior studies | Covers many factors with fewer tests. |
Note: Always check your material’s temperature guide to avoid overheating or underheating.
Fine-Tuning for Specific Printers and Materials
Each printer and material needs special settings. Adjusting these ensures your prints come out right. For example, changing PID settings keeps hotend temperatures steady, which helps with high-heat materials. Adaptive PID control is great for switching between materials like PLA and ABS.
- Case Study 1: A user fixed defects by adjusting PID settings, keeping temperatures steady.
- Case Study 2: Adaptive PID control made material changes smoother, improving print quality.
To fine-tune, make small changes. Test nozzle and bed temperatures, as well as speeds. Use tools like temperature towers or flow rate tests to find the best settings for your printer and material.
Tip: Write down your best settings. This saves time and helps you get consistent results.
Exporting and Printing Your 3D Model
Making G-code for Your Printer
G-code is the instructions your printer follows. It tells the printer where to move, how fast, and how much material to use. This step is very important for making detailed and accurate prints. G-code guides the print head to build your design layer by layer. It also controls material use, keeping the print precise and aligned. Without good G-code, your print might fail or lose detail.
To create G-code, open your model in slicing software. Change settings like layer height, infill, and supports. When ready, save the file as G-code. Always check the layers in the software to spot mistakes before printing.
Tip: Keep a copy of your G-code file. This lets you reprint without slicing again.
Getting Your Printer Ready
Prepare your printer carefully to avoid problems. Follow these steps for smooth printing:
| Step | What to Do |
|---|---|
| Check Material Safety Info | Read about any risks and how to handle materials safely. |
| Set Up Printer Properly | Place the printer on a flat, stable surface with enough space. |
| Use the Right Material | Make sure the material works with your printer to avoid issues. |
| Inspect Printer Parts | Clean and check parts like the nozzle and bed for proper function. |
| Wear Safety Gear | Use gloves, goggles, or masks when working with certain materials like resin or powder. |
These steps help avoid accidents and improve print quality. For example, checking the nozzle ensures smooth material flow.
Note: Always calibrate your printer before starting. This keeps prints accurate and reduces mistakes.
Fixing Printing Problems
Sometimes, issues happen even if you prepare well. Common problems include bad adhesion, warping, or uneven layers. Fix these by trying these tips:
- Adjust the bed level and temperature for a better first layer.
- Use the right material settings to stop warping or weak spots.
- Clean and maintain your printer often to avoid breakdowns.
- Place your model to reduce overhangs and need for supports.
- Learn slicing techniques to avoid mistakes when setting up prints.
These steps can solve most problems and improve your results.
Tip: Write down your printer settings and changes. This helps you find patterns and improve future prints.
Making good 3D prints begins with smart planning and design. You now know how to get your model ready, pick the best software, and tweak settings for better prints. Each step helps make your prints stronger, more precise, and nice to look at.
Tip: Focus on things like shape, size, and supports. Small changes can greatly improve how your print turns out.
Try out various methods and settings to get better at printing. Using these ideas will help you succeed often and explore more in 3D printing.
FAQ
What is the best file format for 3D printing?
STL is the most common format for 3D printing. It works well for most designs and printers. If you need to include colors or materials, use OBJ or 3MF. Always check your printer’s manual for supported formats.
How do you fix warping in 3D prints?
Warping happens when prints cool unevenly. To fix it, use a heated bed and set the right temperature for your material. Adding an adhesive like glue or tape to the bed also helps. Keep your printer in a draft-free space.
Can you 3D print without supports?
Yes, but only for simple designs or small overhangs. For angles over 45 degrees, supports are necessary to prevent sagging. You can reduce the need for supports by adjusting the model’s orientation or adding slopes to overhangs.
What is the ideal layer height for 3D printing?
A layer height of 0.1 mm to 0.2 mm works for most prints. Smaller heights give smoother surfaces but take longer. Larger heights print faster but may lose detail. Test different heights to find the best balance for your project.
How do you ensure your 3D model is printable?
Check for non-manifold geometry, gaps, or overlapping edges. Use software tools to fix these issues. Simplify complex designs and ensure the model fits your printer’s build size. Always preview the model in slicing software before printing.
Tip: Regularly calibrate your printer to improve print quality and accuracy


Leave a comment
All comments are moderated before being published.
This site is protected by hCaptcha and the hCaptcha Privacy Policy and Terms of Service apply.