


Properly assembling 3D printed parts is crucial for ensuring strength and longevity. Misaligned parts can reduce tensile strength by up to 30.35%, which highlights the importance of precision during the process to assemble 3D printed parts. By focusing on preparation, alignment, and bonding, you can optimize durability and functionality. Take the time to assemble 3D printed parts carefully to achieve professional-quality results.
Key Takeaways
- Collect all needed tools and materials first. These include glue, sandpaper, cutters, clamps, and safety equipment. Being ready saves time and makes assembly better.
- Clean and smooth the 3D printed parts for strong bonds. Wipe with rubbing alcohol to remove dirt and grease. Sand with different grits to make surfaces smooth.
- Use alignment tools and mark spots to line up parts. Test fit the pieces a few times to check they match before adding glue.
Preparation for Assembling 3D Printed Parts
Tools and materials needed
Before you begin assembling 3D printed parts, gather the necessary tools and materials to ensure a smooth process. Having the right equipment at hand will save time and improve the quality of your assemblies. Here’s a list of essential items:
- Adhesives: Choose adhesives compatible with your material, such as cyanoacrylate glue for PLA or epoxy for ABS.
- Sandpaper: Use a range of grits, starting with coarse (e.g., 80-grit) and progressing to finer grits (e.g., 400-grit) for a polished finish.
- Cutting tools: Precision knives or flush cutters help trim excess material or remove support structures.
- Clamps: These hold parts in place while adhesives cure, ensuring proper alignment.
- Cleaning supplies: Isopropyl alcohol and lint-free cloths are ideal for removing dust and grease.
- Safety gear: Wear gloves and safety glasses to protect yourself during sanding or when handling adhesives.
By preparing these tools and materials, you’ll streamline the assembly process and achieve better results.
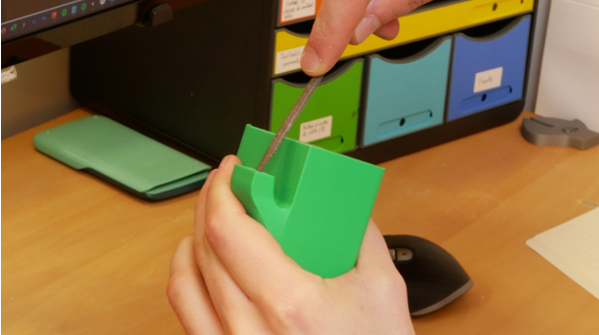
Cleaning and sanding surfaces
Cleaning and sanding are critical steps to ensure strong bonds between 3D printed parts. Residual dust, grease, or uneven surfaces can weaken the connection. Follow these steps for optimal preparation:
- Clean the surfaces: Use isopropyl alcohol and a lint-free cloth to wipe down the contact areas. This removes oils and debris that could interfere with adhesion.
- Sand the surfaces: Start with coarse sandpaper to eliminate rough spots or layer lines. Gradually switch to finer grits for a smooth finish. This process improves the grip of adhesives and creates a seamless appearance.
- Test fit the parts: Before applying adhesive, check the alignment by fitting the parts together. This ensures proper contact and highlights any areas that need additional sanding.
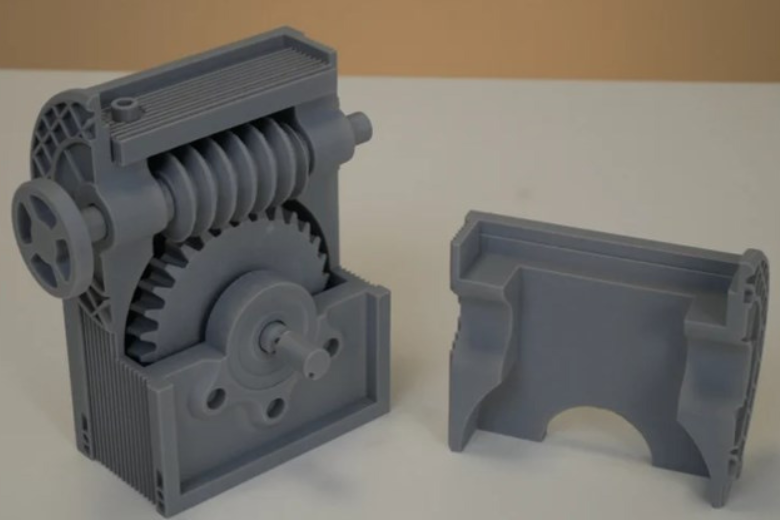
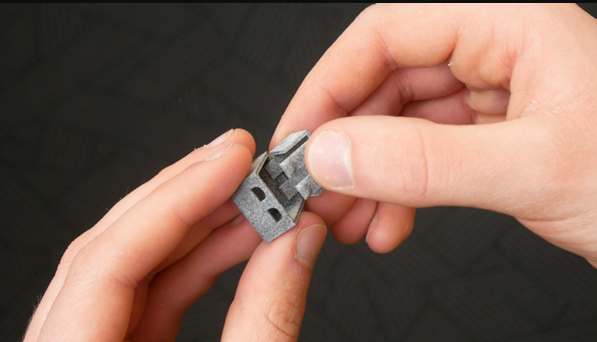
Preparing 3D printed interlocking parts
When working with 3D printed interlocking parts, preparation is key to achieving a functional and durable assembly. Interlocking joints, such as snap-fit designs, require precise alignment and careful handling. Here’s how to prepare them:
- Inspect the interlocking features: Check for defects or excess material that could hinder the fit. Use a precision knife to trim any imperfections.
- Test the fit: Assemble the interlocking parts without adhesive to ensure they align correctly. This step helps you identify any adjustments needed.
- Reinforce the joints: For added strength, consider applying adhesive to the interlocking areas. This is especially useful for assemblies that will endure stress or frequent use.
|
Advantage |
Description |
|---|---|
|
Ease of Assembly |
Interlocking joints simplify the process compared to traditional methods. |
|
Complex Designs |
They enable intricate designs not possible with conventional manufacturing. |
|
Strength and Efficiency |
Interlocking joints enhance structural integrity and reduce the need for fasteners. |
By preparing your interlocking parts thoroughly, you can create assemblies that are both functional and visually appealing. This approach also streamlines the process, especially when you need to split large 3D prints into smaller, manageable sections.
Aligning and Bonding 3D Printed Parts
Techniques for precise alignment
Achieving precise alignment is essential when you assemble 3D printed parts. Misaligned components can compromise structural integrity, functionality, and aesthetics. To ensure accurate alignment, follow these techniques:
- Use alignment tools: Employ tools like dowel pins, clamps, or alignment jigs to hold parts in place during assembly. These tools prevent unwanted movement and ensure proper alignment.
- Mark reference points: Before bonding, mark key alignment points on the parts. This helps you position them correctly and avoid errors during assembly.
- Test fit multiple times: Assemble the parts without adhesive to verify their alignment. Repeat this step until you achieve a perfect fit.
Good alignment is critical in various industries. For example:
- In aircraft production, precise alignment ensures smooth operation of moving components, reducing friction and preventing failure.
- In medical device manufacturing, proper alignment enhances prototype accuracy, directly impacting patient safety.
- Across all applications, accurate alignment improves structural integrity, functionality, and aesthetics.
By prioritizing alignment, you can create assemblies that are both reliable and visually appealing.
How to glue 3D prints securely
Knowing how to glue 3D prints securely is vital for creating durable assemblies. The right adhesive and application technique can significantly enhance the bond strength. Follow these steps to apply glue effectively:
- Choose the right adhesive: Select an adhesive compatible with your material. For PLA, cyanoacrylate glue works well. For ABS, use epoxy for a stronger bond.
- Prepare the surfaces: Clean and sand the bonding areas to remove dust and grease. This step improves adhesive grip and ensures a seamless bond.
- Apply glue evenly: Spread a thin, even layer of adhesive on one surface. Avoid overapplying, as excess glue can weaken the bond or create a messy finish.
- Clamp the parts together: Use clamps to hold the parts in place while the adhesive cures. This ensures proper alignment and prevents movement during bonding.
Studies have shown that proper gluing methods significantly improve the durability of 3D printed parts. For instance:
|
Test Type |
Underextrusion Sample |
Silicone Glue Sample |
Pressure Tolerance (kPa) |
|---|---|---|---|
|
Lap Shear Test |
Higher debonding force |
Lower debonding force |
N/A |
|
Peel-off Test |
10.41 ± 1.35 N |
3.18 ± 1.39 N |
N/A |
|
Pressure Test |
< 8 kPa |
N/A |
By following these steps, you can securely bond your 3D printed parts and create assemblies that withstand stress and wear.
Using interlocking mechanisms
Interlocking mechanisms are a game-changer in 3D printing. They simplify the assembly process, enhance structural integrity, and reduce the need for adhesives or fasteners. When using interlocking joints, keep these tips in mind:
- Design for precision: Ensure the interlocking features are designed with tight tolerances. This minimizes gaps and ensures a snug fit.
- Inspect and test: Check the interlocking joints for defects or excess material. Assemble the parts without adhesive to verify the fit and alignment.
- Reinforce if needed: For assemblies under high stress, consider applying glue to the interlocking areas for added strength.
A study on modular 3D printed assemblies highlights the effectiveness of interlocking mechanisms. For example, in antenna construction, interlocking joints maintained structural integrity and facilitated alignment. This approach reduced misalignment and improved overall durability.
|
Advantage |
Description |
|---|---|
|
Simplified Assembly |
Interlocking joints eliminate the need for complex tools or fasteners. |
|
Enhanced Durability |
Properly designed interlocking joints improve structural strength. |
|
Versatile Applications |
They enable intricate designs and modular assemblies. |
By incorporating interlocking mechanisms into your designs, you can streamline the assembly process and achieve professional-quality results. Whether you're working on small prototypes or large-scale projects, interlocking joints offer unmatched efficiency and reliability.
Finishing and Troubleshooting
Sanding and filling gaps
Sanding and filling gaps are essential steps to achieve a smooth assembly of 3d printed parts. Even with precise interlocking designs, minor imperfections can appear during printing. You can address these issues by following these steps:
- Identify gaps: Inspect the assembled parts for visible gaps or uneven surfaces. Pay close attention to interlocking areas, as they are prone to slight misalignments.
- Sand the edges: Use fine-grit sandpaper to smooth out rough edges. This step ensures a perfect assembly by eliminating protrusions that may prevent proper alignment.
- Fill the gaps: Apply a filler material, such as epoxy putty or a 3D printing-specific gap filler, to seal any visible gaps. Allow the filler to cure completely before proceeding.
Tip: Sand the filler after it cures to create a seamless transition between the parts. This step enhances both the durability and aesthetics of your 3d printed assemblies.
Polishing for a seamless look
Polishing transforms your assembled 3d printed parts into professional-quality products. After sanding and filling, polishing ensures a flawless finish. Here’s how you can polish effectively:
- Choose the right tools: Use polishing compounds and a soft cloth or rotary tool for best results.
- Polish in stages: Start with a coarse compound to remove surface imperfections. Gradually switch to finer compounds for a glossy finish.
- Focus on interlocking areas: Pay extra attention to interlocking joints, as a polished surface improves the overall appearance and functionality.
Polishing not only enhances the visual appeal but also contributes to a smoother assembly process by reducing friction between interlocking parts.
Fixing alignment and bonding issues
Even with careful preparation, alignment and bonding issues can occur during assembly. Address these problems promptly to maintain the integrity of your 3d printed assemblies:
- Recheck alignment: Disassemble the parts and inspect the interlocking features for defects. Sand or trim as needed to ensure a snug fit.
- Reapply adhesive: If the bond fails, clean the surfaces thoroughly and reapply the adhesive. Use clamps to hold the parts in place while the glue cures.
- Test the assembly: After fixing the issues, test the assembled parts to confirm proper alignment and bonding.
Note: Regularly testing your assemblies during the process helps you identify and resolve issues early, ensuring a perfect assembly every time.
Assembling 3D printed parts demands attention to detail and a methodical approach. By focusing on preparation, alignment, bonding, and finishing, you can achieve durable and visually appealing results. The growing use of materials like plastic, metal, and composites in 3D printing highlights the importance of these steps for creating robust assemblies.
-
Key insights from industry trends:
- Plastic offers versatility for custom designs.
- Metal ensures durability and eco-friendliness.
- Composite materials provide enhanced properties and sustainability.
Take your time, use the right tools, and troubleshoot issues to ensure success. Whether you’re working with interlocking designs or glued assemblies, these strategies will help you assemble 3D printed parts with precision and confidence.
FAQ
What are interlocking mechanisms in 3D printing?
Interlocking mechanisms are design features that allow parts to fit together securely without adhesives. They enhance structural integrity and simplify the assembly process.
How do you ensure interlocking parts fit perfectly?
Test the fit before final assembly. Sand rough edges and remove excess material to ensure smooth interlocking. Precision during design also plays a critical role.
Can interlocking designs replace adhesives entirely?
Yes, for many applications. However, for high-stress assemblies, combining interlocking mechanisms with adhesives can provide additional strength and durability.


發表評論
在發布之前,所有評論都會進行調節。
此網站已受到 hCaptcha 保護,且適用 hCaptcha 隱私政策以及服務條款。