


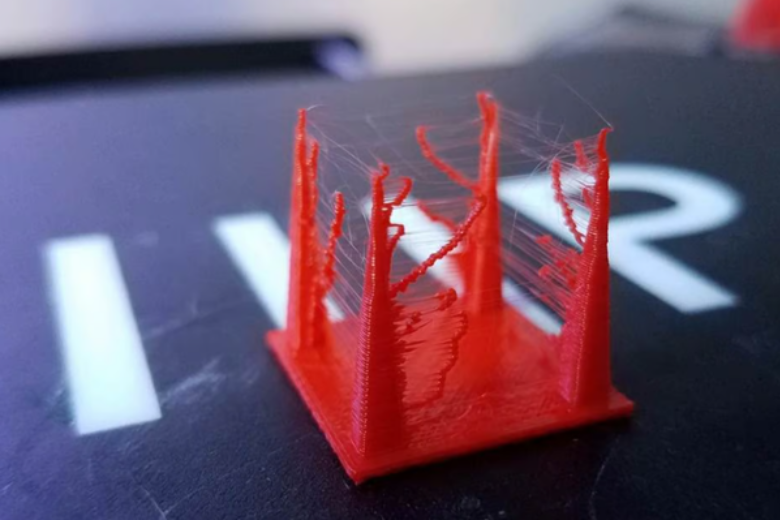
Stringing—those annoying spiderweb-like strands of plastic that appear between gaps in your 3D prints—is a common frustration for FDM 3D printer users. When the nozzle moves across open spaces, melted filament can ooze out and solidify where it shouldn’t, leaving behind a messy "beard" on your otherwise perfect model.
The primary causes of stringing are incorrect retraction settings and excessive nozzle temperature, though other factors like print speed, filament moisture, and nozzle cleanliness also play a role. Materials like PETG are particularly prone to stringing due to their high printing temperatures, but even PLA and ABS can suffer from this issue.
In this guide, we’ll explore five effective methods to eliminate stringing and achieve clean, professional-looking prints.
1. Enable and Optimize Retraction
Retraction is the most critical setting for preventing stringing. When enabled, the extruder pulls the filament back slightly during non-printing moves, reducing pressure in the nozzle and preventing oozing.
Key Retraction Settings to Adjust:
- Retraction Distance – Determines how far the filament is pulled back.
- Direct drive extruders: 0.5–1.0 mm
- Bowden setups: 2–6 mm (longer distances compensate for tube slack)
- Too much retraction can cause clogs; too little won’t stop stringing.
- Retraction Speed – Controls how quickly the filament retracts.
- Ideal range: 40–60 mm/s for PLA/ABS
- Too slow allows oozing; too fast may grind filament.
Advanced Retraction Tweaks (Cura & Simplify3D)
- "Combing Mode" – Avoids retractions when moving inside the model.
- "Wipe & Coasting" – Reduces pressure before travel moves.
- "Minimum Travel for Retraction" – Prevents unnecessary retractions on short moves.

Pro Tip: Print a retraction test tower (available on Thingiverse) to fine-tune these settings for your specific printer and filament.
2. Lower Nozzle Temperature
Higher temperatures make filament more fluid, increasing the chances of oozing. If you notice excessive stringing, try reducing the nozzle temp by 5–10°C (but stay within the manufacturer’s recommended range).
Optimal Nozzle Temperatures for Common Filaments:
| Material | Recommended Nozzle Temp | Bed Temp |
|---|---|---|
| PLA | 180–220°C | 50–60°C |
| ABS | 210–250°C | 90–110°C |
| PETG | 220–250°C | 70–80°C |
| TPU | 210–230°C | 30–60°C |
Test Method: Print a temperature calibration tower to find the sweet spot where stringing is minimized without causing underextrusion.
3. Increase Travel Speed
Slower travel moves give molten plastic more time to leak out. Speeding up non-print movements (190–200 mm/s) reduces the chance of stringing.
Adjust in Your Slicer:
- "Travel Speed" (Cura: Speed > Travel Speed)
- "Avoid Printed Parts When Traveling" (reduces cross-model stringing)
Warning: Excessively high speeds can lead to layer shifts or motor skips—ensure your printer can handle the acceleration.
4. Clean or Replace the Nozzle
A dirty nozzle can contribute to stringing, especially after printing with sticky materials like PETG.

Nozzle Cleaning Steps:
- Heat the nozzle to printing temperature.
- Wipe with a brass brush to remove external residue.
- Use a 0.4mm cleaning needle to clear internal clogs.
- Cold pull (atomic method) to remove burnt filament.
If stringing persists, replace the nozzle—worn-out nozzles often leak filament unpredictably.
5. Keep Filament Dry
Moisture absorption causes bubbles and erratic extrusion, worsening stringing.
How to Prevent Wet Filament:
- Store filament in sealed bags with desiccant.
- Use a filament dryer (or food dehydrator) before printing.
- For severe moisture issues, bake PLA at 45°C for 4–6 hours (higher temps can warp it).
Test for Moisture: If your filament makes popping sounds while extruding, it’s too wet.
Bonus: Advanced Anti-Stringing Techniques
- Linear/Pressure Advance (Klipper) – Adjusts extrusion pressure dynamically.
- Z-Hop (Use Sparingly) – Lifts the nozzle during travel but can increase stringing.
- Different Slicers – Some (like PrusaSlicer) have better default retraction settings.
Final Thoughts
Stringing is fixable—start with retraction tuning, then adjust temperature and speed. If problems persist, check nozzle cleanliness and filament dryness.
Need a quick test model? Try the "Stringing Test" on Thingiverse to validate your settings.
By following these steps, you’ll achieve smooth, string-free 3D prints every time. Happy printing!


Zostaw komentarz
Wszystkie komentarze są moderowane przed opublikowaniem.
Ta strona jest chroniona przez hCaptcha i obowiązują na niej Polityka prywatności i Warunki korzystania z usługi serwisu hCaptcha.